If you haven’t already completed part one of this series, Creating the Primary Domain Controller, I suggest you visit that page first. If, on the other hand, you have at least the primary DC configured, including DHCP, DNS, and Remote Access (NAT), please continue. At the end of part one, the lab network looked like this:

The focus of this post is to get up and running a secondary DC in the lab environment, hosted in the cloud. The assumption will be made that the base OS installation has been completed per this earlier post.
Network Adapter Configuration
Remember, the Ethernet driver will need to be installed for virtio ISOs, as per this post. Disable the public facing NIC of the server. Open the private network adapter properties via the Network and Sharing Centre:

Open the IPv4 properties and configure the static private IP of this server to be similar to that of the primary DC:

Point the secondary DC default gateway and DNS to the primary DC IP address configured in part one of this series.
Click OK, OK, then Close. Static IP configuration complete.
Domain Forest Functional Level
Each time Microsoft creates a new version of the Server operating system, they upgrade the way Active Directory domains function. This being the case, a domain functional level can only ever be as high as the oldest DC in an environment will allow.
For example, in a domain with a primary DC which is Server 2012 R2, and a secondary DC which is Server 2008, the forest functional level can only be Server 2008 in order to be compatible with both servers (AD isn’t forwards compatible, only backwards). Hence, if we created the AD domain on a Server 2016 server, the forest functional level will need to be manually lowered to allow this Server 2012 R2 DC to function correctly within the environment.
First, check the current forest functional level in PowerShell:
Get-ADForest

As can be seen here, the ForestMode is set to 7 (which is Windows 2016). Both the Forest Mode and Domain Mode will, therefore, need to be lowered to Server 2012 R2. To do this, run this command in PowerShell:
Set-ADForestMode -ForestMode Windows2012R2Forest

Enter the domain name as shown in the Get-ADForest command output, and confirm that you want to make the changes. Run Get-ADForest again to make sure the forest level has been updated:

Now, change the domain functional level with the following PowerShell command:
Set-ADDomainMode -DomainMode Windows2012R2Domain

Enter the domain name and confirm as before. Check the domain functional level:
Get-ADDomain

That’s it. Now when we try to promote this server to a DC, everything should work correctly.
Server Configuration
The setup of the secondary DC is very similar to the primary DC, with some slight differences. First, in Server Manager, select Local Server on the left. Then, click the current Computer Name (mine was WIN-D17GES6QFO6):

Click Change:

Enter the desired Computer Name (I chose Ares this time), tick the Domain radio button and enter the domain name configured earlier on the primary DC, then click OK:

NB: You may need to put in the FQDN of the domain, i.e. cherrypie.corp.
At this point, a Windows security pop-up should appear, requesting credentials for the domain being joined. Enter the named domain administrator username and password created in part one, then click OK to join the domain:

If successful, a confirmation dialogue will appear as below. If unsuccessful, an error dialogue will appear. Most errors can be fixed with a quick Google, but it’s worth testing connectivity between this machine and the primary DC first (i.e. ping, etc.).

Click OK until the properties window is the only one left (besides Server Manager), then click Close on this window. At this point the server will ask to reboot, so…
Reboot.
Once rebooted, I downloaded/configured Windows Updates and changed the timezone of the machine:

Role Configuration
Once in Server Manager, click Manage, then Add Roles and Features:

Tick Skip this page by default if you so choose. Click Next. Select Role-based or feature-based installation, then click Next:

Leave Server Selection as default, click Next again. Tick Active Directory Domain Services:

Accept the additional (prerequisite) installations as well:

Leave Features as default, click Next. Click Next on AD DS. Click Install. Once done, click Close.
Domain Controller Promotion
There should now be a warning in Server Manager, indicating the server should be promoted to domain controller. Click Promote this server to a domain controller:

The Add a domain controller to an existing domain radio button should already be selected, and the domain name and administrator credentials filled in (if not, make it so):

Click Next. I won’t be making this server a secondary DNS server at this stage, so I made sure the DNS tick box was unticked. The global catalogue tick box should remain ticked. Enter the Restore Password, and click Next:

Leave the Additional options as default, click Next. Leave Paths as default as well, click Next. On the Review Options page, review the options you have configured, ensure they are correct, then click Next. Finally, click Install. The server should automatically restart once installation is complete.
With that done, the secondary DC is now fully functional (if everything succeeded). At the moment it should be able to browse the Internet, which is great for testing connectivity, but should typically be disabled via one method or another. In any event, connectivity between the two DCs should be working as well.
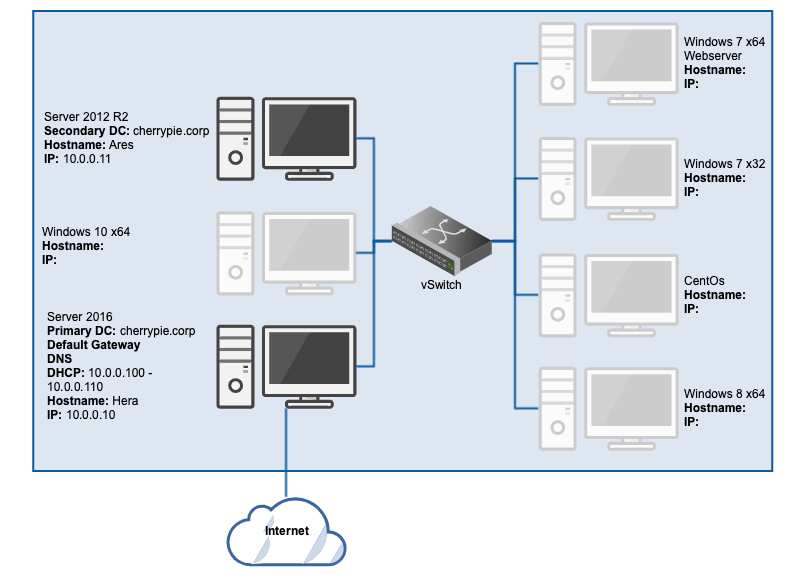
Take a snapshot of both the primary and secondary DCs in their respective current states. Once complete, it’s time to look at adding some workstations to the domain. Here’s what the current lab network should look like:

Go here to see how the Server 2016 primary DC was created, or here to move on and create a Windows 10 workstation within the lab domain.